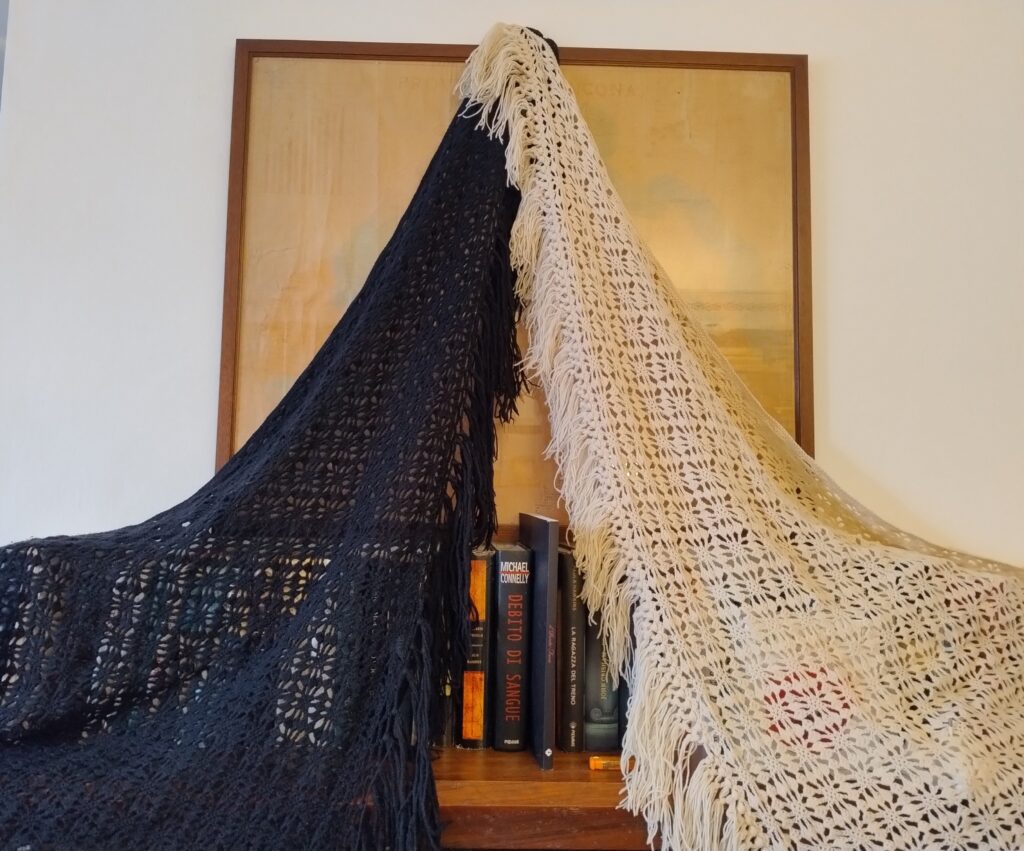
BLACK or WHITE? CHOOSE YOUR SHAWL
A 15 anni, già appassionata di lavori ad uncinetto, deciso di “monetizzare” il mio hobby e comincio a lavorare per un negozio di filati…così nel mio tempo libero da impegni scolastici ho realizzato numerosi scialli (molto alla moda negli anni ’80) e due ne ho realizzati per me. Ancora li uso in varie occasioni!
When I was 15, very keen on crocheting, I decided to get some cash from my hobby and I started to work for a yarn/DIY shop…so in my free time, far from school duties, I made lots of shawls (really fashionable in the ’80s) and I kept two of them for me. I still use them in several occasions!

Schema:
- Materiali Necessari per realizzare uno scialle delle dimensioni di 185 cm di larghezza per 75 cm di lunghezza:
- Filato bianco di lana o cotone da lavorare con l’uncinetto n^3
- Uncinetto n^3
- Forbici
- Ago da cucito per filati
- Punti Base Utilizzati:
- Catenella (ch)
- Maglia bassa (mb)
- Maglia alta (ma)
- Maglia alta doppia (mad)
- Pippiolino (picot)
- Istruzioni:
Avviamo il lavoro facendo 5 catenelle
1^giro: 1 MA sulla 4^catenella dall’uncinetto, 1 MA (tot: 3 MA)
2^giro: 4 catenelle, 2 MA nella 1^MA sottostante, 3 cat, nella MA sottostante facciamo 1 MA doppia e 2 MA nello stesso punto;
3^giro: 4 cat, 2 MA nella 1^MA sottostante, 3 cat, 1 MB all’interno dello spazio sottostante di 3 cat, 3 cat, (1 MA doppia, 2 MA) nella 4^cat dell’inizio;
4^giro: 4 cat, 2 MA nello stesso punto, 3 cat, 1 MB prima della MB sottostante, 1 MB sopra la MB sottostante, 1 MB dopo la MB sottostante, 3 cat, (1 MA dopppia, 2 MA) nella 4^cat;
5^giro: 4 cat, 2 MA nello stesso punto, 4 cat, 5 MB con lo stesso sistema di sopra, 4 cat, (1 MA doppia, 2 MA) nella 4^ cat;
6^giro: 4 cat, 2 MA mello stesso punto, 3 cat, 3 MA nello spazio di 4 cat sottostanti, 4 cat, 3 MB sopra le 5 MB (quindi saltiamo la prima e l’ultima MB e andiamo a lavorare sulle 3 MB centrali), 4 cat, 3 MA nello spazio di 4 cat sottostanti, 3 cat, (MA doppia, 2 MA) sulla 4^cat dell’inizio;
7^giro: 4 cat, 2 MA nello stesso punto, 3 cat, 1 MB nello spazio sottostante di 3 cat, 3 cat, 3 MA, 4 cat, 1 MB sulla 2^MB sottostante, 4 cat, 3 MA nello spazio delle 4 cat sottostanti, 3 cat, 1 MB nello spazio di 3 cat sottostanti, 3 cat, (1 MA doppia, 2 MA) nella 4^cat iniziale;
8^giro: 4 cat, 2 MA nello stesso punto, 3 cat, 3 MB, 3 cat, 3 MA nello spazio di 4 cat sottostanti, 3 cat, 3 MA sopra le 4 cat sottostanti, 3 cat, 3 MB, 3 cat, (1 MA doppia, 2 MA) nella 4^cat iniziale;
9^giro: 4 cat, 2 MA nello stesso punto, 4 cat, 5 MB, 4 cat, 3 MA nello spazio di 3 cat, 4 cat, 5 MB, 4 cat, (1 MA doppia, 2 MA) nella 4^cat iniziale;
10^giro: 4 cat, 2 MA nello stesso punto, 3 cat, 3 MA nello spazio di 4 cat sottostanti, 4 cat, 3 MB, 4 cat, 3 MA nello spazio di 4 cat sottostanti, 3 cat, 3 MA nell’altro spazio, 4 cat, 3 MB, 4 cat, 3 MA, 3 cat, (1 MA doppia, 2 MA) nella 4^cat iniziale;
11^giro: 4 cat, 2 MA nello stesso punto, 3 cat, 1 MB nello spazio di 3 cat sottostanti, 3 cat, 3 MA nello spazio di 4 cat sottostanti, 4 cat, 1 MB, 4 cat, 3 MA, 3 cat, 1 MB, 3 cat, 3 MA nello spazio di 4 cat sottostanti, 4 cat, 1 MB, 4 cat, 3 MA, 3 cat, 1 MB, 3 cat, (1 MA doppia, 2 MA) nella 4^cat iniziale;
12^giro: 4 cat, 2 MA nello stesso punto, 3 cat, 3 MB, 3 cat, 3 MA, 3 cat, 3 MA, 3 cat, 3 MB, 3 cat, 3 MA, 3 cat, 3 MB, 3 cat, (1 MA doppia, 2 MA) nella 4^cat iniziale;
13^giro: 4 cat, 2 MA nello stesso punto, 4 cat, 5 MB, 4 cat, 3 MA, 4 cat, 5 MB, 4 cat, 3 MA, 4 cat, 5 MB, 4 cat, (1 MA doppia, 2 MA) nella 4^cat iniziale.
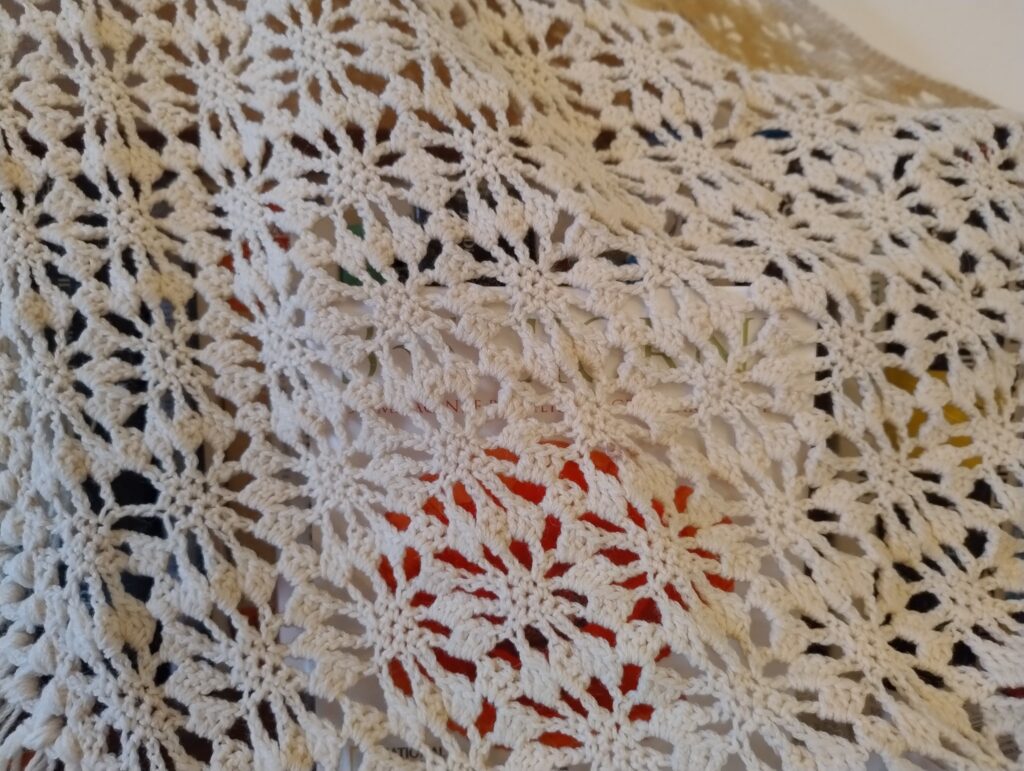
Per continuare proseguiamo sempre seguendo lo schema facendo l’inizio e la fine sempre nello stesso modo e aumentando i ragnetti centrali. Per raggiungere una larghezza di 185 cm occorreranno 22 ragnetti ma naturalmente questo dipenderà necessariamente dal tipo di filato e dal numero di uncinetto che si sceglie.
A questo punto andiamo a rifinire la parte orizzontale a maglie basse cercando di andare a MB dove sono le maglie, mettiamo 2 MB dove sono 3 cat e 3 MB dove ci sono 4 cat.
Facciamo ancora un altro giro a MB in modo che questo lato lungo dello scialle diventi sempre più rettilineo.
Di giri a MB se ne possono fare a piacere seguendo ognuno il proprio senso estetico.
Rifiniamo poi a punto gambero per terminare la parte orizzontale.
Nei lati obliqui mettiamo dei semplici archetti di catenelle in cui inseriremo le frange. Questi archetti li otteniamo con 5 catenelle.
L’unica accortezza è al vertice inferiore del triangolo che rappresenta lo scialle perché lì è importante che si trovi una frangia perpendicolare altrimenti si rischia di rovinare l’estetica di tutto il lavoro per cui mettiamo un archetto, appunto, al vertice inferiore del triangolo.
Pattern:
- Materials Needed to create a shawl with dimensions of 185 cm width by 75 cm length:
- White wool or cotton yarn suitable for crochet hook size 3
- Crochet hook size 3
- Scissors
- Sewing needle for yarn
- Basic Stitches Used:
- Chain (ch)
- Single Crochet (sc)
- Double Crochet (dc)
- Treble Crochet (tr)
- Picot (picot)
- Instructions:
- Starting Chain: Make 5 chains (ch)
- 1st Row: 1 dc in the 4th ch from the hook, 1 dc (total: 3 dc)
- 2nd Row: 4 ch, 2 dc in the 1st dc of the previous row, 3 ch, in the next dc make 1 tr and 2 dc in the same stitch.
- 3rd Row: 4 ch, 2 dc in the 1st dc of the previous row, 3 ch, 1 sc in the 3-ch space below, 3 ch, (1 tr, 2 dc) in the 4th ch from the beginning.
- 4th Row: 4 ch, 2 dc in the same stitch, 3 ch, 1 sc before the sc below, 1 sc on the sc below, 1 sc after the sc below, 3 ch, (1 tr, 2 dc) in the 4th ch.
- 5th Row: 4 ch, 2 dc in the same stitch, 4 ch, 5 sc as above, 4 ch, (1 tr, 2 dc) in the 4th ch.
- 6th Row: 4 ch, 2 dc in the same stitch, 3 ch, 3 dc in the 4-ch space below, 4 ch, 3 sc over the 5 sc (skip the first and last sc, work on the 3 central sc), 4 ch, 3 dc in the 4-ch space below, 3 ch, (1 tr, 2 dc) in the 4th ch from the beginning.
- 7th Row: 4 ch, 2 dc in the same stitch, 3 ch, 1 sc in the 3-ch space below, 3 ch, 3 dc, 4 ch, 1 sc in the 2nd sc below, 4 ch, 3 dc in the 4-ch space below, 3 ch, 1 sc in the 3-ch space below, 3 ch, (1 tr, 2 dc) in the 4th ch from the beginning.
- 8th Row: 4 ch, 2 dc in the same stitch, 3 ch, 3 sc, 3 ch, 3 dc in the 4-ch space below, 3 ch, 3 dc over the 4-ch space, 3 ch, 3 sc, 3 ch, (1 tr, 2 dc) in the 4th ch from the beginning.
- 9th Row: 4 ch, 2 dc in the same stitch, 4 ch, 5 sc, 4 ch, 3 dc in the 3-ch space, 4 ch, 5 sc, 4 ch, (1 tr, 2 dc) in the 4th ch from the beginning.
- 10th Row: 4 ch, 2 dc in the same stitch, 3 ch, 3 dc in the 4-ch space below, 4 ch, 3 sc, 4 ch, 3 dc in the 4-ch space below, 3 ch, 3 dc in the next space, 4 ch, 3 sc, 4 ch, 3 dc, 3 ch, (1 tr, 2 dc) in the 4th ch from the beginning.
- 11th Row: 4 ch, 2 dc in the same stitch, 3 ch, 1 sc in the 3-ch space below, 3 ch, 3 dc in the 4-ch space below, 4 ch, 1 sc, 4 ch, 3 dc, 3 ch, 1 sc, 3 ch, 3 dc in the 4-ch space below, 4 ch, 1 sc, 4 ch, 3 dc, 3 ch, 1 sc, 3 ch, (1 tr, 2 dc) in the 4th ch from the beginning.
- 12th Row: 4 ch, 2 dc in the same stitch, 3 ch, 3 sc, 3 ch, 3 dc, 3 ch, 3 dc, 3 ch, 3 sc, 3 ch, 3 dc, 3 ch, 3 sc, 3 ch, (1 tr, 2 dc) in the 4th ch from the beginning.
- 13th Row: 4 ch, 2 dc in the same stitch, 4 ch, 5 sc, 4 ch, 3 dc, 4 ch, 5 sc, 4 ch, 3 dc, 4 ch, 5 sc, 4 ch, (1 tr, 2 dc) in the 4th ch from the beginning.
To continue, always follow the pattern, starting and ending the same way while increasing the central “spiders”. To reach a width of 185 cm, you will need approximately 22 “spiders,” but this may vary depending on the type of yarn and hook size used.
At this point, finish the horizontal part with single crochets (sc), ensuring to place sc where there are stitches, 2 sc in 3-ch spaces, and 3 sc in 4-ch spaces. Make another round of sc to ensure the long side of the shawl becomes more linear. The number of rounds can vary according to personal aesthetic preferences.
Finish with a crab stitch to complete the horizontal part. On the sloping sides, make simple chain arches to insert the fringes. These arches are made with 5 chains. The only precaution is at the lower vertex of the triangle representing the shawl, where it is important to have a perpendicular fringe to maintain the overall aesthetic. Place an arch at the lower vertex of the triangle.